Wednesday, April 3, 2013

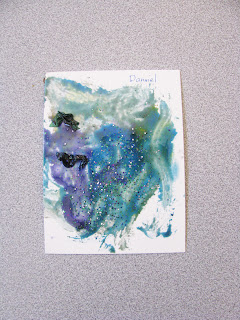
Maple Syrup Collage Paintings


Here in Vermont Spring arrives a bit late. Luckily we have some wonderful things to keep us happy while we await the buds and blooms. One of these is Maple Sugaring season! Many years ago I came up with this project as a follow-up to a preschool field trip to the local Sugar House. This morning the excited oooohs and ahhhs of the entire group during my demo let me know this activity is still a favorite.


Maple Syrup Collage Paintings                 
Copyright 2000

Materials
*maple syrup - light in color is better
*small watercolor brushes - inexpensive ones are best
*small plastic dishes for paints
*small plastic bowls for tissue and cellophane
*small plastic containers with lids to store paints
*food coloring in a variety of colors - Wilton concentrated paste ones for cake decorating are
   the best - a little bit goes a very long way and the colors are intense
*small pieces of white mat board or student grade watercolor paper - approx. 3”x5”
*small pieces of colored tissue paper cut into little squares and triangles
*small pieces of colored cellophane cut into little squares and triangles
*glitter in a variety of colors in shaker jars

Preparation
*prepare the paints by mixing small amounts of food coloring into small amounts of maple
  syrup - cost is a factor which is why I do the paintings so small - if your base for
  painting is small and your brushes are small, the paintings will be small and not as costly
*mix about 6 different colors
*set up the table so each child has one mat board or paper and the paints are in the
  dishes with a couple of brushes in each color 
* keep the tissue, cellophane, and glitter aside until paintings are done
*cover the table with a white or solid colored plastic tablecloth or brown kraft paper
  (I find newspaper is visually distracting to children when making art, so if necessary to
  cover the tables for easier clean up, try using a solid or neutral color)

Procedure
*start out by reading a story that ties in to the project, such as one about sugaring
   or pancakes or such - also do a related song or rhythm game
* do a demonstration of the project in the circle where all can see and take questions
*explain that this project is part painting and part collage
* let them loose to go to the tables and begin
*as they work, colors will get mixed and that is fine, but it is nice to start out with pure colors
*put a very small amount in each dish and refill as needed
* after their painting is done provide the tissue, cellophane, and glitter
*because the syrup is so sticky the collage elements will stick without glue
*when the paintings are dry the collage elements will be stuck to the surface and the
maple syrup paint will still look slightly wet, so they are colorful, shiny, and glittery


Tuesday, February 5, 2013

Swim & Swirl

It is getting to that point in our loooooong Vermont winter when thoughts of summer abound. Time for a warm weather story.

One day, a few years back, I was pondering something imponderable and doodling away with my usual repeating spiral motif. Later that same day, while sorting some family photos, I came across this snapshot of me, happy as a clam, poolside. Check out the design on my little swimsuit. Yup. Spirals. Water and spirals, two of my favorite things. Oh, and of course the dot.

So, today I give you little Judy in her spiral swimsuit poolside, and a video I made last summer during my Gathering Winooski Project, where dots and water create spirals and art!

I think in this case the picture and the video are worth at least a thousand words.

Enjoy!


Monday, January 21, 2013

Children's Button Stamper Booklets


I did the button stamper project with the kiddos in both my preschool art classes the week after posting the lesson plan here. I prepared a little 6 page booklet for each of them to stamp in, using 8 1/2 x 11 sheets of white paper folded in half. I had gotten a box of this paper at the ReUse Zone at the Drop Off Center and it was the perfect weight and texture for this activity - not too thick, and pretty smooth. I put one staple on the folded edge, and then covered the staple with a piece of silver duct tape so no-one would get scratched. Although the silver duct tape might seem an odd choice, it works great to cover the staple, create added flexibility to the "spine" of the little book, and it is SHINY! This little booklet also creates the slight cushion that makes the stamps make their best impression. (Pun intended).

I put out some colored pencils with the stampers and ink pads. Some chose to use them, but on this particular day many just went with the stampers and did not do much additional drawing.

As always, the children explored the materials freely, and used some of the materials in slightly unusual ways as you can see from the photos. The large color blocks are made by stamping with the inkpad directly onto the paper, and in some cases dragging it across the page like a paintbrush.
Enjoy the gallery!


Monday, January 7, 2013

Winter Crochet

I do love the wintry weather here in Vermont for staying indoors and doing creative projects. I have long found that the inward gaze brought on by the long cold winters feeds my imagination and increases my creative output.

I have crocheted a few more toddler sized hats for my etsy shop in a soft warm wool blend yarn. I am also working up a few infant sized hats in the same pattern in a beautiful pima cotton yarn. They would make the perfect baby shower gift any time of year. I love the basket weave pattern I am using, and the shape of these little chapeaus. They are fun to work on, and because of the nature of the pattern it is easy to keep track of where I am, without pesky stitch or row counting, so my mind can wander while I work. Most enjoyable. The style satisfies my love of texture and sculptural forms as well.

Here are a few photos of some of the toddler sized ones I have made thus far. You can see more in my shop  - www.etsy.com/shop/dotandswirl


Thursday, January 3, 2013

Button Stampers


I have some collections. A couple few… One of my favorite collections is my stack of vintage craft books – or should I say Kraft with a K books – as these are the KITCHY kind from the 50’s and 60’s that are chock full of unique projects using everyday materials to create the strange and unusual. This is the stuff I grew up on – which explains a lot. 
I will do a separate blog post about this treasure trove of delightful tomes some other time, but the point of this blog post is to say that this button stamper is not my original idea, but in fact came from one of these books.

I made my button stampers many years ago for a workshop I gave at a teacher’s conference. I have used them on numerous occasions since with children and adults and they are good as new.

Here ya go –

Materials –
 *old buttons with cool designs and some raised areas
*old corks – either the real deal or the new fangled kind
* strong glue - a strong white glue like Elmer’s or Aleene’s
*ink stamp pads
*slight padding for work surface like folded newspaper
*fine point washable magic markers or colored pencils
*paper or card stock

Procedure –
*glue one button with design side up, to the end of each cork
* let em dry overnight
*put the folded newspaper on your work surface for padding
* stamp button stamper on ink pad
*stamp button stamper on paper
*sometimes you need to rock ‘em slightly to get a good print
*add details with markers
*they make great:
  wheels for vehicles
  flower centers
  sun
  animal heads
  and more

*after your work session is done wipe them clean with soft rag
* you can wash them with warm water and towel dry them, but wiping them off is usually sufficient, and makes them last longer


Dot & Swirl

A new year and a new beginning. I launched my new Dot & Swirl etsy shop on Jan. 1, 2013. I am excited about the new focus for my creative explorations. Dot & Swirl is named for two of my favorite things; the polka-dot - the world's smallest harbinger of joy, and the swirl - the universal symbol of energy and spark.

I am feeling sparkly and inspired to share my creations and my ideas for children and the child in us all. I have begun stocking my little shop with soft toys created from my stenciled images formerly seen on clothing in the 80's and 90's under the name Hand Painted Clothing By Jude Bond. The little critters have been making a ruckus packed away in the studio, so I have let them out, this time printed onto fabrics and backed and stuffed to create squeezable softies for play or display.

So far in the shop there are bunnies, sheep, chickens and trilobites (soft rocks!). I am working on some kitties and some horses today. There are  also several crocheted hats for toddlers with more to come. I am working on prototypes for wrist bands for dance and dramatic play, and crocheted and felted headband fascinators for young girls.

I plan to also sell PDF downloads of crochet patterns I have designed, and art lesson plans I have created over my decades of art teaching with young children.

In this blog you can read about my new creations and explorations in the studio, as well as get some free instructions for art and craft projects to do with your young friends; whether they be your children, your students, or adults you know who wish to get more in touch with their child self through creative play.

Here is the link to my new shop!

http://www.etsy.com/shop/dotandswirl

Happy New Year!
Jude